If there’s one place in the house that absorbs all the random bits you don’t quite know what to do with, it’s your garage.
One day, it’s a tidy spot for your car; the next, it’s your home’s unofficial ‘everything drawer’, except it’s bigger and features at least three camping chairs with missing poles.
But turning it from a chaos zone to a functional space doesn’t require a full renovation. With the right plan and maybe a cold drink waiting at the end, you can get the job done in no time. Let’s get into it.
Table of Contents
Declutter Like a Pro
First things first: it’s time for the big reveal. That means pulling everything out of your garage—yes, even the boxes you strategically shoved into the corner three summers ago.
Once everything is out in the open, start sorting your gear into broad categories, with your tools in one spot, sports equipment in another, and seasonal decorations in their own little cluster.
Now comes the moment of truth. Take a breath and be honest with yourself as you go through each category.
Ask yourself the tough questions: Do you really need two broken rakes? Is that half-flat footy ever making a comeback? Are you actually going to use those leftover tiles you’re keeping just in case?
The items that are still in decent condition can be rehomed or donated; someone else might genuinely get some use out of them. As for anything broken, expired, or questionably sticky, don’t overthink it and just discard it.
Deep Clean Your Garage
With the clutter finally out of the way, let’s give your garage the kind of clean-up it probably hasn’t had in years.
To do this, sweep the space to get rid of the dust, dried leaves, and cobweb colonies that have been quietly thriving in the corners.
After you’ve cleared the loose debris, take a look at the floor. If it’s got that classic stained look most garages have, grab a mop or fire up the pressure washer. You’ll be amazed at how different the whole area will look once that layer of grime is gone.
Then, move on to the surfaces. Wipe down the shelves, benchtops, and any storage nooks so you don’t end up putting back your items onto dusty surfaces.
However, if you’re tempted to just shut your garage door and pretend none of this exists, you can always bring in professional cleaning services. They’ll blitz through the place while you sip a coffee and supervise from a safe distance.
Choose the Right Storage Solutions
Now comes the satisfying part: turning your garage into a space that actually works for you. With everything cleaned and cleared out, you can finally start setting up storage that makes sense for the long haul.
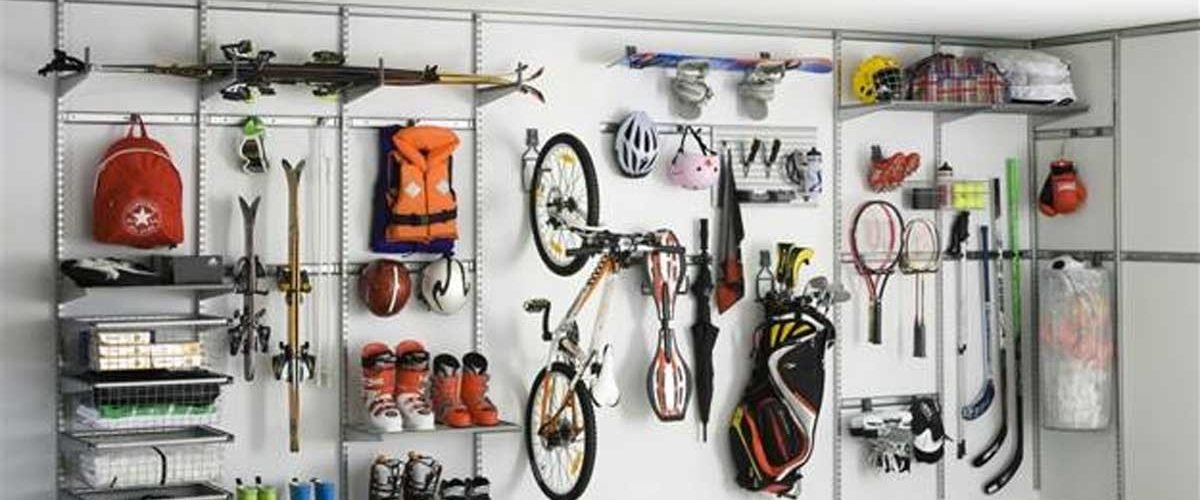
Vertical storage is your best bet here, because every centimetre of your floor space counts. Wall-mounted shelves keep boxes off the ground, and pegboards are an absolute game-changer for keeping your tools visible and within easy reach.
This way, you won’t have to tear the place apart searching for that one screwdriver you could’ve sworn was right there a minute ago.
If you’ve got bulky items, like camping gear or Christmas decorations, go for overhead racks. They’ll keep these pieces accessible without letting them take up the entire room, which is always ideal for those things you only need a few times a year.
For smaller garages or ones pulling double duty as a gym/workshop/storage hybrid, don’t stress. You can still make the space feel roomy with clever solutions like stackable bins, slimline shelving, foldaway workbenches, or even wall-mounted bike racks.
Create Zones and Use Labels
To prevent things from drifting back into the ‘I’ll just put this here for now’ territory, map out where everything should be stored.
You can do this by grouping things by how you use them. Keep your tools together, stack sports gear in one area, and push anything seasonal or rarely used out of the way.
Even those extra lightbulbs, batteries, spare cords, and random DIY bits deserve their own spot.
To make the system foolproof, add labels to all your bins and boxes. This is the part that will keep your whole system from collapsing the second someone else wanders in looking for the masking tape.
You don’t need anything fancy. You can create your own by printing them out or using masking tape and a marker. What matters is that they’re readable at a glance.
Remember, the more precise the label is, the less likely you’ll shove unrelated items in the wrong spot. If you prefer colour coding, go for it, but keep the system simple enough that you’ll actually stick with it.
Prioritise Safety
So, you’ve cleared, cleaned, and sorted out your garage—great job! Now, take a moment to make sure your garage isn’t just functional but also safe to use.
Having an easy-to-navigate space is non-negotiable, especially if you’ve got kids, pets, or anyone who tends to wander in looking for tools.
Here are some safety essentials to keep in mind:
- Keep chemicals out of children’s reach. Place them on high shelves or inside a lockable cabinet to prevent curious hands from grabbing something they shouldn’t.
- Store heavy items close to the ground. Anything bulky or weighty is far safer on the lower shelves, where you can easily lift it without straining or getting injured.
- Make sure your lighting is bright and even. Good lighting will help you see what you’re doing, avoid accidents, and find things quickly.
- Secure or repair anything that wobbles, shifts, or feels unstable. Loose brackets, shaky shelving, lifted floor edges, and poorly anchored racks might seem minor now, but dealing with them early will prevent bigger problems or falling objects later on.
Conclusion
And there you have it—a garage that’s decluttered, cleaned, organised, labelled, and safe. Not only does everything have a place, but you can actually find every item without moving 14 other things to get to it.
So, take a moment to admire that glorious floor and breathe in the smell of your freshly cleaned space. You’ve done it!