Looking for a way to employ firebase push notification? This article is about implementing push notifications to Android through Firebase. Read on!
Table of Contents
Introduction
Firebase was introduced in the year 2011 by the company named Firebase. Later in the year 2014, the government acquired this company and added more advanced features to this product. As a result, Firebase now offers many useful features, and today we will discuss how we can implement firebase push notifications in Android.
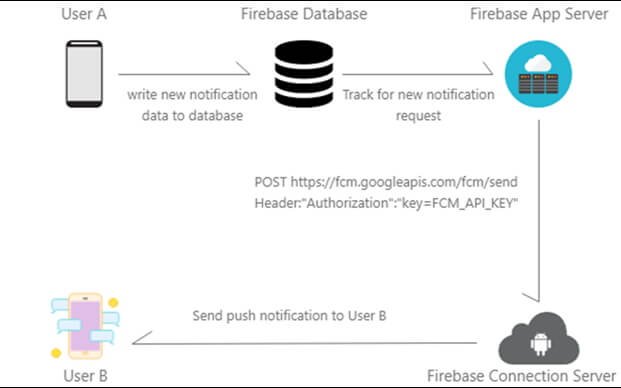
The updated Google cloud messaging service is called Firebase cloud messaging. It is the cross messaging platform that helps push messages across various devices. Firebase platform creates the bridge between the server and devices where Android Push Notifications will be sent. You need to send push notifications straight to the registered devices. The given image illustrates the process.

The detailed instructions have discussed in this article. So, read on!
How Does Firebase Push Notification Work?
Your server and the devices that will receive the push notifications you build are connected by Firebase as a module. Then, the server informs the Firebase that the message has been sent. And the Firebase works behind the sights until the notification is published.
How to Implement Firebase Cloud Messaging Into Android?
Here is the step-by-step guide to implementing FCM into android.
Step 1: Launch the firebase console

Step 2: Tap on the add project and give the name of your project. Then, choose the country. If you already created the project, skip this step.

Step 3: Click on the “create project” and then select “add firebase” to your android app.

Step 4: Next, you need to add your project product ID or the application and create the SHA-1 signature of the machine.

Step 5: Now, download google-service.json and put it into the app module.

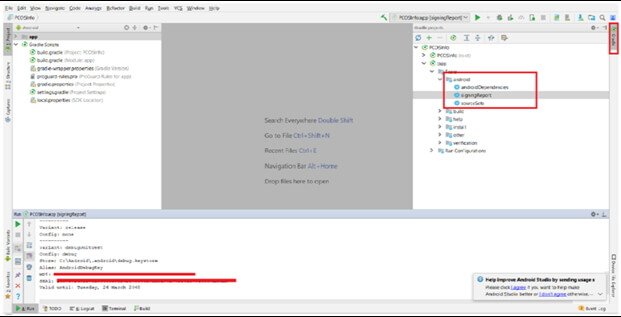
Steps To Create SHA Key Using Android Studio
Step 1: Launch your project into the android studio.
Step 2: Next, click on the Gradle tab from the right side of the window.
Step 3: Go to app module >> tasks >> android >> singing report. SHA- 1 will be generated.
Step 4: Copy and paste into SHA-1 in the firebase console.
How to Integrate Firebase SDK into Android?
Step 1: Go to the <project>/build.gradle file, and copy the below coding.
buildscript {
dependencies {
// Add this line
classpath ‘com.google.gms:google-services:4.3.2’
}
}
Step 2: Copy the below code and add into <Project> / <app> build.gradle.
dependencies {
// Add this line
implementation ‘com.google.firebase:firebase-messaging:20.0.0’
}
…
// Add to the bottom of the file
apply plugin: ‘com.google.gms.google-services
Step 3: Now, press the sync button in the android studio.
Step 4: When you’ve successfully synced, edit the AndroidManifest.xml file, or you can download the projects.
The service extends the firebase messaging service. Therefore, it is necessary if you wish to handle any messages other than receiving notifications from apps in the background. However, if you want to receive notifications foreground, receive data payload, send upstream messages, and so on.
Below is the coding you need to use.
<service
android:name=”.MyFirebaseMessagingService”
android:exported=”false”>
<intent-filter>
<action
android:name=”com.google.firebase.MESSAGING_EVENT”/>
</intent-filter>
</service>
You’re ready to send push notifications using the Firebase Console. If you want to check whether the device receives notifications or not, take the test message.
Check if Is Device Can Receive Notifications
When you’re ready to send push notifications on android, it is essential to ensure the devices you are pushing push notifications have enabled Google Play services. Otherwise, users/devices are unable to receive the notifications.
To check this, add this function – MainActivity Kit

Now, explore what code does.
- Use android’s availability API to find the Google play services.
- If you find the status is not showing good results, you need to manage the error. With this, you can see users can’t receive push notifications.
- And if it s showing successful status, there is no problem, and you can continue with the notification.
If you again get errors because of the missing imports, add those imports at the top of the file with the given code.

Next, copy the below code and check it to OnClickListner, which is at the right button_retrive_token.setOnClickListner
{

Based on your push notifications purposes, you might want to display an alert message to the user. First, test the error by creating an Android Virtual Device with Google Play Services disabled. You will find a message on the screen – Use another image. This is because app dependencies use Google Play Services.

Create and run. You must see no change in the app.
The Bottom Line
We hope this tutorial helped you to understand the basics and techniques to implement FCM into android push notifications. However, if you have any questions or doubts, share them with us. One more thing, if you are not sure about firebase push notifications, check WonderPush.