
At its core, diamond painting is a unique and meditative craft that seamlessly blends artistry with a hint of puzzle-solving. Tiny, resin “diamonds” or drills, each shimmering like a precious gem, are meticulously placed onto a canvas to create a visually stunning mosaic. The end result is a radiant masterpiece that sparkles with brilliance, bringing to life intricate designs and vibrant colors.
Custom Diamond Painting
Custom diamond painting or Diamond Painting Personalisiert, takes this enchanting art form to new heights. No longer confined to predesigned kits, enthusiasts can now embark on a personalized journey of creation. Whether you’re translating a cherished photograph into a dazzling mosaic or designing an entirely original masterpiece, custom diamond painting empowers artists to infuse their unique identity into every shimmering facet.
Rising Popularity and Therapeutic Benefits of Custom Diamond Painting
As the rhythmic process of placing each diamond unfolds, it’s not just the image that comes to life; it’s the mind and soul of the artist. Diamond painting has soared in popularity not merely as a craft but as a therapeutic escape. Its calming, meditative nature provides solace in a chaotic world, offering a sanctuary where creativity and mindfulness intertwine. Joining the ranks of mindfulness practices, custom diamond painting has become a cherished ritual for those seeking respite and rejuvenation through artistic expression.
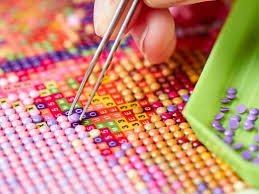
Table of Contents
Getting Started with Custom Diamond Painting
Embarking on the creative journey of custom diamond painting is an exciting venture that combines artistry with relaxation. To get started, gather your materials: a canvas with the chosen design, diamond drills, a applicator pen, wax, and a tray. Ensure your workspace is well-lit and organized for a smooth process.
Begin by carefully unrolling the canvas and flattening any wrinkles. Familiarize yourself with the canvas symbols, matching them to the corresponding diamond colors. Pour the diamonds into the tray and shake gently to align them properly. Dip the applicator pen into the wax, making it easier to pick up the diamonds.
Starting from the edge of the canvas, work in small sections to prevent the adhesive from drying out. Press the diamonds onto the canvas using the applicator pen, ensuring a snug fit. For intricate details, consider using tweezers for precision. Don’t worry about mistakes; the diamonds can be easily repositioned.
Take breaks to avoid eye strain and maintain focus. Store your project in a flat, safe place to prevent damage. As you progress, the dazzling mosaic will emerge. With patience and attention to detail, you’ll create a stunning custom diamond painting that reflects your artistic flair. Enjoy the process and let your creativity shine!
Designing Your Custom Diamond Painting
Designing your diamond painting or diamond painting deutschland is an engaging process that allows you to transform your imagination into a dazzling mosaic. Start by selecting a meaningful image or pattern for your canvas. Whether it’s a cherished photo, a favorite artwork, or a unique design, choose something that resonates with you.
Once you have your image, use digital editing software or specialized diamond painting design tools to convert it into a pixelated format. This step helps define the color palette and create a clear guide for diamond placement. Adjust the size of the image to match your desired canvas dimensions.
Consider the level of detail you want in your custom diamond painting. Simplify complex images for a beginner-friendly project or embrace intricate designs for a more challenging experience. Pay attention to color variations to ensure a vibrant and visually appealing final result.
After finalizing the design, order a custom diamond painting kit that includes the canvas, diamonds, and tools. Many online platforms offer this service, allowing you to upload your design and receive a complete kit tailored to your specifications.
Once the kit arrives, set up a well-lit workspace and carefully unroll the canvas. Begin placing the diamonds according to your design, working methodically to bring your vision to life. Don’t hesitate to make adjustments as needed, and take breaks to enjoy the creative process.
Designing your custom diamond painting adds a personal touch to this relaxing and rewarding craft. Whether you create a masterpiece from scratch or modify an existing image, the finished product will be a unique reflection of your creativity and style.
Preparation and Workspace Setup for Diamond Painting
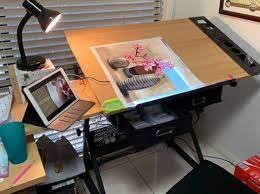
Creating a conducive environment for diamond painting is essential for an enjoyable and successful crafting experience. Start by designating a clean and well-lit workspace. Natural light or a bright lamp will enhance visibility and help you distinguish between the various colors of diamonds. Ensure that the workspace is comfortable, minimizing the risk of eye strain or discomfort during long crafting sessions.
Gather all the necessary diamond painting accessories before you begin. This includes your diamond painting kit, which typically includes a canvas with the design, diamond drills, an applicator pen, wax, and a tray. Lay out all items neatly to avoid clutter and confusion during the crafting process.
Prepare the canvas by carefully unrolling it and flattening any wrinkles. Take a moment to review the symbols on the canvas and familiarize yourself with the corresponding diamond colors. If your kit doesn’t come with a legend, create one for easy reference throughout the project.
Organize your diamond drills in the tray, shaking it gently to align them properly. Dip the applicator pen into the wax to make it easier to pick up the diamonds. Consider using additional storage containers or labels for better organization, especially if you’re working on a large and intricate design with numerous colors.
Once your workspace and materials are organized, you’re ready to begin the diamond painting process. By taking the time to set up a comfortable and organized environment, you’ll enhance your focus, reduce stress, and ensure a more enjoyable crafting experience from start to finish.
Techniques and Pro Tips for Diamond Painting
Achieving a stunning diamond painting involves more than just placing gems on a canvas. Here are some techniques and pro tips to elevate your diamond painting skills:
- Start from the Edges: Begin your diamond painting from the edges and work your way towards the center. This prevents accidental smudging of diamonds and ensures a smoother overall finish.
- Use a Multi-Placer Tool: Invest in a multi-placer tool that allows you to pick up and place multiple diamonds at once. This speeds up the process, especially for larger sections of the canvas with the same color.
- Wax Management: Keep the wax tip of your applicator pen clean and not overloaded with wax. Excessive wax can make it challenging to pick up diamonds, while too little wax may result in them not sticking well.
- Tweezers for Detailing: For intricate parts of the design, especially small or hard-to-reach areas, use tweezers instead of the applicator pen. Tweezers provide more precision.
- Mind the Resin: Some diamond paintings have a layer of resin that covers the diamonds. Be gentle when placing diamonds on resin-coated areas to avoid damaging the surface.
- Storage Solutions: Use small containers or a storage box with compartments to organize different diamond colors. Label each compartment with the corresponding symbol or number for quick identification.
- Consistent Pressure: Apply consistent pressure when placing diamonds to ensure they are securely attached. Gently press down on each diamond to make sure it adheres well to the adhesive.
- Check Alignment Regularly: Periodically step back and check the overall alignment of your diamonds. This helps catch any mistakes or misalignments early in the process.
- Rolling Technique: To flatten any raised edges on the canvas, use a rolling pin or a straight-edged object. This ensures that all diamonds are firmly pressed onto the adhesive.
- Sealing the Finished Piece: Consider using a sealant or clear adhesive spray to protect your completed diamond painting and enhance its longevity.
By incorporating these techniques and pro tips into your diamond painting routine, you’ll not only enhance the efficiency of the process but also create a more polished and professional-looking finished product.
Troubleshooting Common Issues In Diamond Painting
Diamond painting is a delightful craft, but like any creative process, there may occur some common issues in diamond painting. Here are solutions for troubleshooting:
- Difficulty Picking Up Diamonds:
- Solution: Ensure the wax on the applicator pen is neither too much nor too little. Adjust the amount of wax to make it easier to pick up diamonds. Clean the pen tip regularly to remove excess wax.
- Canvas Wrinkles:
- Solution: Lay the canvas flat and use a heavy book or a rolling pin to gently smooth out wrinkles. If the canvas is severely wrinkled, consider placing it under a mattress or heavy books overnight.
- Misaligned Diamonds:
- Solution: Check the alignment regularly, especially when completing sections. If you notice misaligned diamonds, use a pair of tweezers to adjust them carefully. Take your time to ensure proper placement.
- Diamonds Not Sticking:
- Solution: Press each diamond firmly onto the canvas to ensure a secure bond. If certain diamonds continue to lift, you can use a clear-drying adhesive to reinforce them after completing the painting.
- Canvas Adhesive Issues:
- Solution: If the adhesive on the canvas seems insufficient, you can apply a thin layer of clear glue or double-sided tape to the affected area before placing the diamonds.
- Difficulty Identifying Symbols:
- Solution: Create a legend or key for yourself by placing small labels or colored stickers with corresponding symbols or numbers next to each color on the canvas. This makes it easier to identify and pick the right diamonds.
- Eye Strain:
- Solution: Take regular breaks to avoid eye strain. Ensure your workspace is well-lit with natural or artificial light, and consider using a magnifying lamp if necessary.
- Running Out of Diamonds:
- Solution: Plan ahead and order extra diamonds, especially if you’re working on a large or intricate design. Some suppliers offer replacement diamonds, but having extras on hand can save time.
- Spilled Diamonds:
- Solution: Use a clean tray or shallow container for holding diamonds to minimize the risk of spills. If a spill occurs, work in a controlled environment and take your time picking up the diamonds.
- Canvas Damage:
- Solution: Be gentle when working on the canvas to avoid tears or damage. If a small tear occurs, clear tape can be used on the back of the canvas to secure it.
By addressing these common issues promptly and applying these solutions, you can enhance your diamond painting experience and ensure a more enjoyable and successful crafting session.

Framing and Displaying Your Diamond Painting Masterpiece
Framing and displaying the diamond painting adds the perfect finishing touch to your masterpiece. Here’s a step-by-step guide:
- Allow Adequate Drying Time:
- Before framing, ensure your diamond painting is completely dry. If you’ve used any sealant or adhesive spray, follow the recommended drying time specified on the product.
- Select a Suitable Frame:
- Choose a frame that complements the size and style of your diamond painting. Consider frames with a glass or acrylic front to protect the diamonds from dust and damage.
- Frame Preparation:
- Disassemble the frame and clean the glass or acrylic front to remove any fingerprints or debris. Ensure the frame’s interior is free from dust or particles that may affect the appearance of your artwork.
- Position the Diamond Painting:
- Carefully center your diamond painting within the frame. If necessary, use masking tape to temporarily secure the canvas in place while you adjust its position.
- Secure the Painting:
- Once satisfied with the placement, secure the diamond painting in the frame. If the frame has backing material or securing clips, follow the frame’s instructions to keep the canvas in place.
- Matting (Optional):
- Consider adding a mat between the glass/acrylic and the diamond painting for an extra layer of visual appeal. Ensure the mat color complements your artwork.
- Reassemble the Frame:
- Put the frame back together, ensuring everything is snug and secure. Check that the glass or acrylic is clean and free from any smudges or streaks.
- Hanging Hardware:
- Attach hanging hardware to the back of the frame if it doesn’t already have it. Make sure the hardware is appropriate for the weight of the frame and painting.
- Choose the Right Location:
- Select a suitable location for displaying your framed diamond painting. Avoid direct sunlight, as prolonged exposure can cause the colors to fade over time.
- Alternative Display Options:
- If framing isn’t your preference, consider alternative display methods. You can stretch the canvas over a wooden frame or mount it on a foam board for a frameless, contemporary look.
- Share and Enjoy:
- Share your diamond painting masterpiece with friends and family. Consider creating a dedicated space in your home where the artwork can be admired and serve as a focal point.
Taking the time to frame and display your diamond painting not only protects your hard work but also allows you to showcase your creativity and dedication. Whether hung on a wall or displayed in a prominent area, your completed diamond painting is sure to be a conversation starter and a source of pride.
Conclusion
In conclusion, diamond painting is a captivating and rewarding artistic endeavor that allows individuals to express their creativity and produce stunning, sparkling masterpieces. Whether you’re a beginner or an experienced enthusiast, the key to a successful diamond painting experience lies in careful preparation, thoughtful execution, and attention to detail.
In the world of diamond painting, the journey is just as important as the destination. Each sparkling gem meticulously placed on the canvas represents a moment of creativity and dedication. So, dive into the world of diamond painting, embrace the process, and let your imagination shine through every dazzling facet of your finished artwork. Enjoy the journey of transforming tiny diamonds into a radiant masterpiece that reflects your unique style and artistic flair.